
The Chocolate Chip Cookies of My Dreams Recipe
Introduction
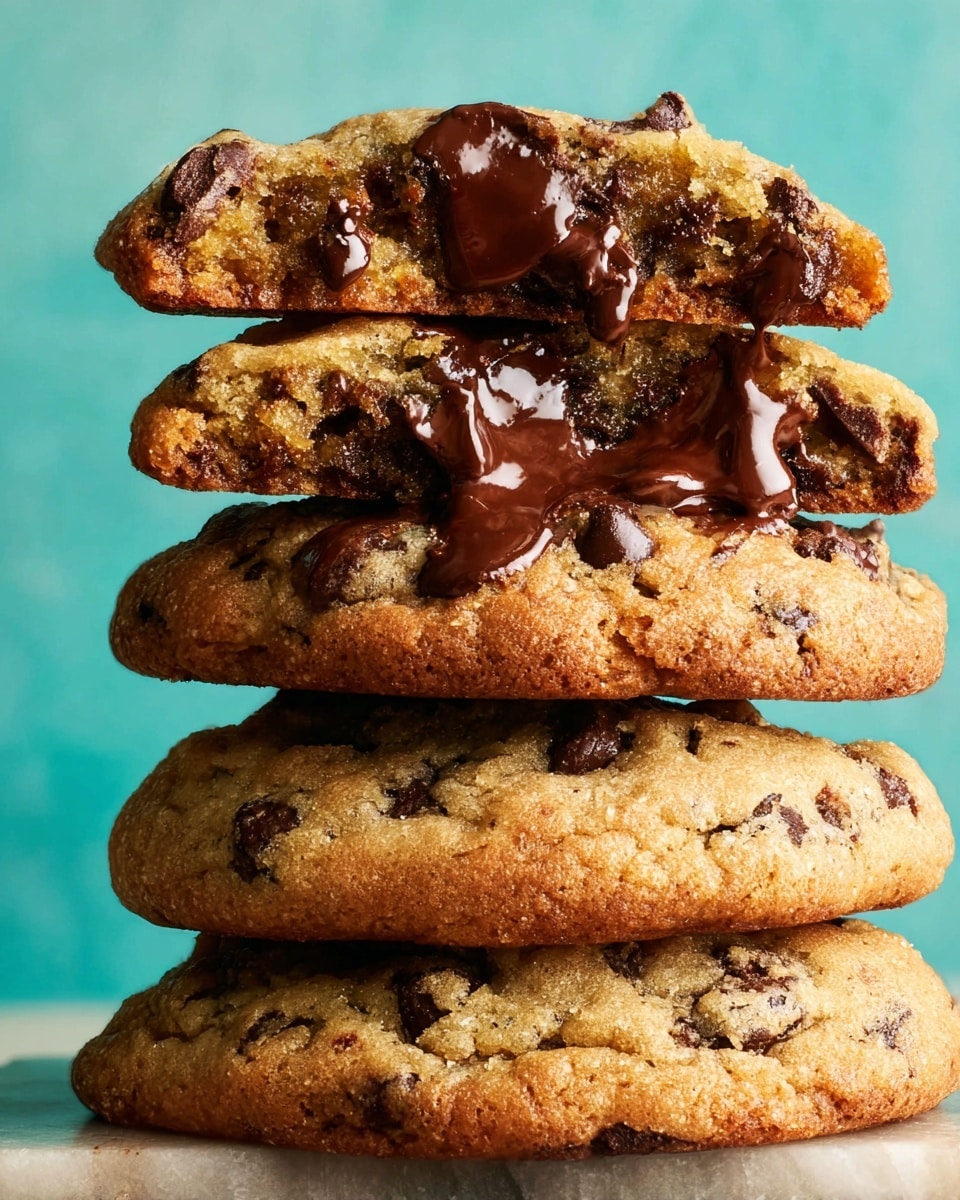
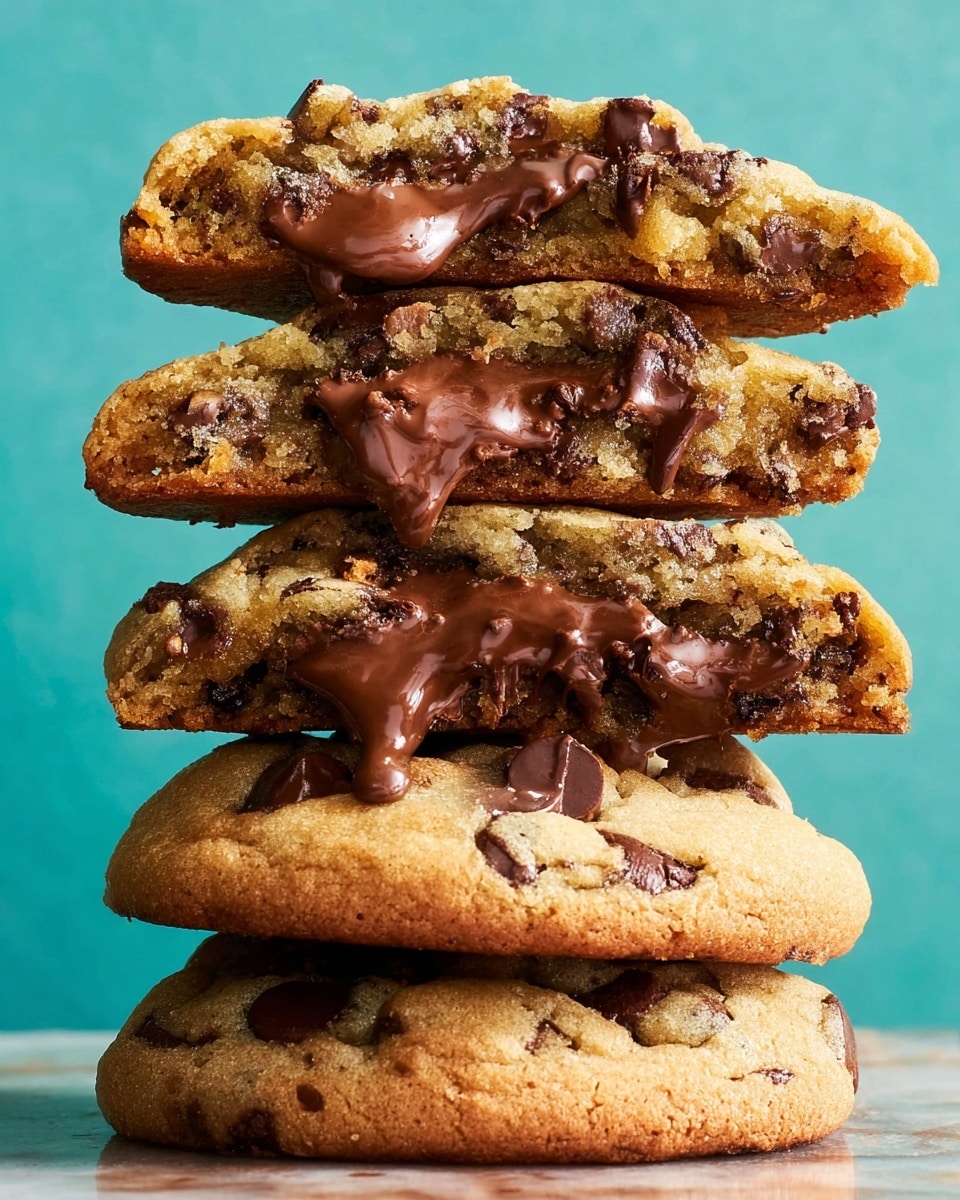
These chocolate chip cookies are the perfect balance of crispy edges and soft, chewy centers. Made with browned butter and a mix of dark and milk chocolate chips, they offer rich, nutty flavor and irresistible texture. Let’s walk through how to create the chocolate chip cookies of your dreams.
Ingredients
- 225g (2 US sticks) unsalted butter, cut into 1cm (1/2″) cubes
- 2 cups (300g) plain flour / all-purpose flour, spooned and levelled
- 3 tsp cornflour/cornstarch, tightly packed and levelled
- 1/4 tsp baking powder
- 1/2 tsp baking soda / bi-carb, sifted if lumpy
- 1/2 tsp cooking salt / kosher salt (halve for table salt, increase by 50% for flakes)
- 1 tightly packed cup (200g) light brown sugar
- 1/2 cup (100g) caster sugar / superfine sugar
- 1 large egg (55g / 2 oz, at room temperature)
- 1 large egg yolk, at room temperature
- 1 tsp vanilla extract
- 1 1/2 cups (250g) dark chocolate chips / semi-sweet chocolate chips, plus extra for decorating
- 3/4 cup (150g) milk chocolate chips
Instructions
- Step 1: Brown the butter by melting it in a silver saucepan or small pan over medium-high heat. Let it simmer for 4 to 5 minutes while stirring occasionally until it becomes foamy with golden specks and smells nutty. Immediately pour it into a heatproof bowl, including the specks, and cool to room temperature (~45 minutes).
- Step 2: In a separate bowl, whisk together the plain flour, cornflour, baking powder, baking soda, and salt.
- Step 3: Add both sugars to the cooled browned butter and mix with a wooden spoon. Then add the egg, egg yolk, and vanilla extract, mixing until smooth and caramel-like in appearance.
- Step 4: Gradually add the dry ingredients to the wet mixture, stirring until the flour is mostly incorporated. Fold in the dark and milk chocolate chips until fully combined.
- Step 5: Divide the dough into 8 portions, each weighing about 155g (1/2 cup). Roll each into a ball, then shape into discs approximately 3.75cm (1.5″) thick. Place these discs in a very airtight container.
- Step 6: Refrigerate the dough discs for 12 to 24 hours, or up to 48 hours for more developed flavor.
- Step 7: Preheat your oven to 180°C (350°F), or 170°C (340°F) if using a fan-forced oven.
- Step 8: Arrange 4 cold dough discs spaced about 7.5cm (3″) apart on a baking tray lined with parchment paper.
- Step 9: Bake for 17 minutes until the edges are golden and the surface is set but still pale.
- Step 10: Working quickly, press extra chocolate chips onto the hot cookies’ surface. Cool them on the tray for 20 minutes to finish baking and develop crispy edges. Optionally, tidy the shape with a spatula while warm.
- Step 11: Eat immediately at their peak or let cool fully on a rack before storing.
Tips & Variations
- Use fresh butter for optimum browning results and a richer nutty flavor.
- For smaller cookies, reduce the dough portion size accordingly and adjust baking time as needed.
- Chilling the dough longer (up to 48 hours) improves flavor and texture by allowing ingredients to meld.
- Pressing extra chocolate chips on top just after baking keeps the look and adds gooey bursts of chocolate.
Storage
Store cooled cookies in an airtight container at room temperature for up to 5 days. To keep them fresh longer, refrigerate for up to 2 weeks or freeze for up to 3 months. Reheat gently in a low oven or microwave for a few seconds to regain softness.
How to Serve
Serve this delicious recipe with your favorite sides.
FAQs
Can I use salted butter instead of unsalted?
You can, but reduce or omit the added salt in the recipe to avoid over-seasoning.
Why do I need to chill the dough before baking?
Chilling solidifies the fat, which helps prevent spreading during baking and improves the cookie’s texture and flavor.
Print
The Chocolate Chip Cookies of My Dreams Recipe
- Total Time: 13 hours 37 minutes (including 12-hour chilling)
- Yield: 8 large cookies 1x
Description
These decadent chocolate chip cookies deliver the perfect balance of crispy edges and chewy centers. Made with browned butter for a rich, nutty flavor, and a mix of dark and milk chocolate chips, they are chilled overnight for enhanced texture and baked to golden perfection. Ideal for cookie lovers seeking a bakery-quality treat at home.
Ingredients
Butter
- 225g / 2 US sticks unsalted butter, cut into 1cm / 1/2″ cubes
Dry Ingredients
- 2 cups (300g) plain flour / all-purpose flour, spooned and leveled
- 3 tsp cornflour/cornstarch, tightly packed and leveled
- 1/4 tsp baking powder
- 1/2 tsp baking soda / bi-carb, sifted if lumpy
- 1/2 tsp cooking salt / kosher salt (halve for table salt, +50% for flakes)
Sugars
- 1 tightly packed cup (200g) light brown sugar
- 1/2 cup (100g) caster sugar / superfine sugar
Eggs & Flavorings
- 1 large egg (55g / 2 oz in shell), at room temperature
- 1 yolk from a large egg, at room temperature
- 1 tsp vanilla extract
Chocolate Chips
- 1 1/2 cups (250g) dark chocolate chips / semi-sweet chips, plus extra for decorating
- 3/4 cup (150g) milk chocolate chips
Instructions
- Brown the Butter: Place the butter in a small pan over medium-high heat. Allow it to melt completely, then continue simmering for 4 to 5 minutes, stirring occasionally. Watch for foam and small golden brown specks; the butter should smell nutty and rich. Remove from heat immediately.
- Cool the Butter: Pour the browned butter along with the browned bits into a heatproof bowl. Let cool to room temperature for about 45 minutes, ensuring it’s cool enough to not melt chocolate chips later.
- Whisk Dry Ingredients: In a separate bowl, whisk together the plain flour, cornflour, baking powder, baking soda, and salt until combined.
- Mix Wet Ingredients: To the cooled browned butter, add both the brown sugar and caster sugar. Mix using a wooden spoon until smooth. Add the whole egg, egg yolk, and vanilla extract, stirring until the mixture looks caramel-like and smooth.
- Combine Ingredients: Gradually add the dry ingredients to the wet mixture, stirring until mostly incorporated. Add both dark and milk chocolate chips and mix until all flour is fully incorporated and the dough is uniform.
- Shape Dough Discs: Portion the dough into eight equal parts of approximately 155g (about 1/2 cup) each. Roll each portion into a ball, then flatten gently to form discs roughly 3.75cm / 1.5″ thick. Place discs in a very airtight container.
- Chill the Dough: Refrigerate dough discs for at least 12 hours and up to 48 hours to develop flavor and texture.
- Preheat Oven: When ready to bake, preheat your oven to 180°C / 350°F (or 170°C fan-forced).
- Arrange Cookies for Baking: Place four cold dough discs on a baking tray lined with parchment paper, spacing them about 7.5cm / 3″ apart to allow for spreading.
- Bake: Bake the cookies for 17 minutes or until edges turn golden and the surface is set but still pale. Avoid overbaking to retain softness inside.
- Decorate and Cool: Right after removing cookies from the oven, quickly press extra chocolate chips onto the tops if desired. Allow cookies to cool on the tray for 20 minutes to finish baking and firm up, while edges crisp and color deepens. Optionally, gently reshape cookies into rounds while still warm using a rubber spatula.
- Serve or Store: Enjoy the cookies warm for the best texture, or cool completely on a rack before storing in an airtight container.
Notes
- Note 1: Spoon and level flour to avoid compacting, which can make cookies dense.
- Note 2: Do not substitute baking soda with more baking powder as it will alter texture and rise.
- Note 4: Cooling browned butter before mixing prevents melting chocolate chips prematurely.
- Note 5: For smaller cookies, adjust dough portion size accordingly but bake time may need altering.
- Note 6: Dough can chill anywhere from 12 to 48 hours; longer chilling improves flavor and texture.
- Note 7: Fan ovens should use slightly lower temperature to prevent overbaking.
- Note 8: Use parchment paper or silicone mats to prevent sticking and ensure even baking.
- Note 9: Adding extra chocolate chips on top enhances visual appeal and chocolate intensity.
- Prep Time: 20 minutes
- Cook Time: 17 minutes per batch
- Category: Dessert
- Method: Baking
- Cuisine: American
Keywords: chocolate chip cookies, brown butter cookies, chewy cookies, homemade cookies, dessert, baking


