
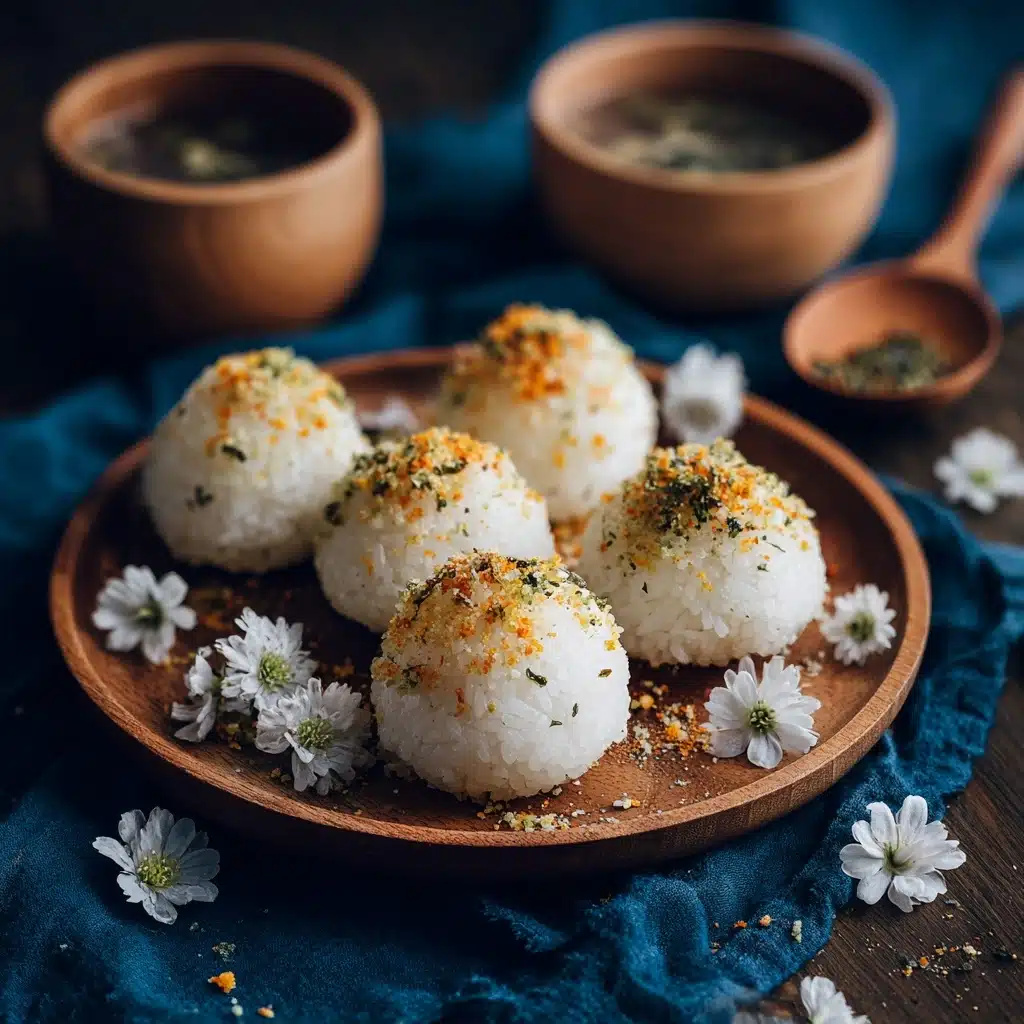
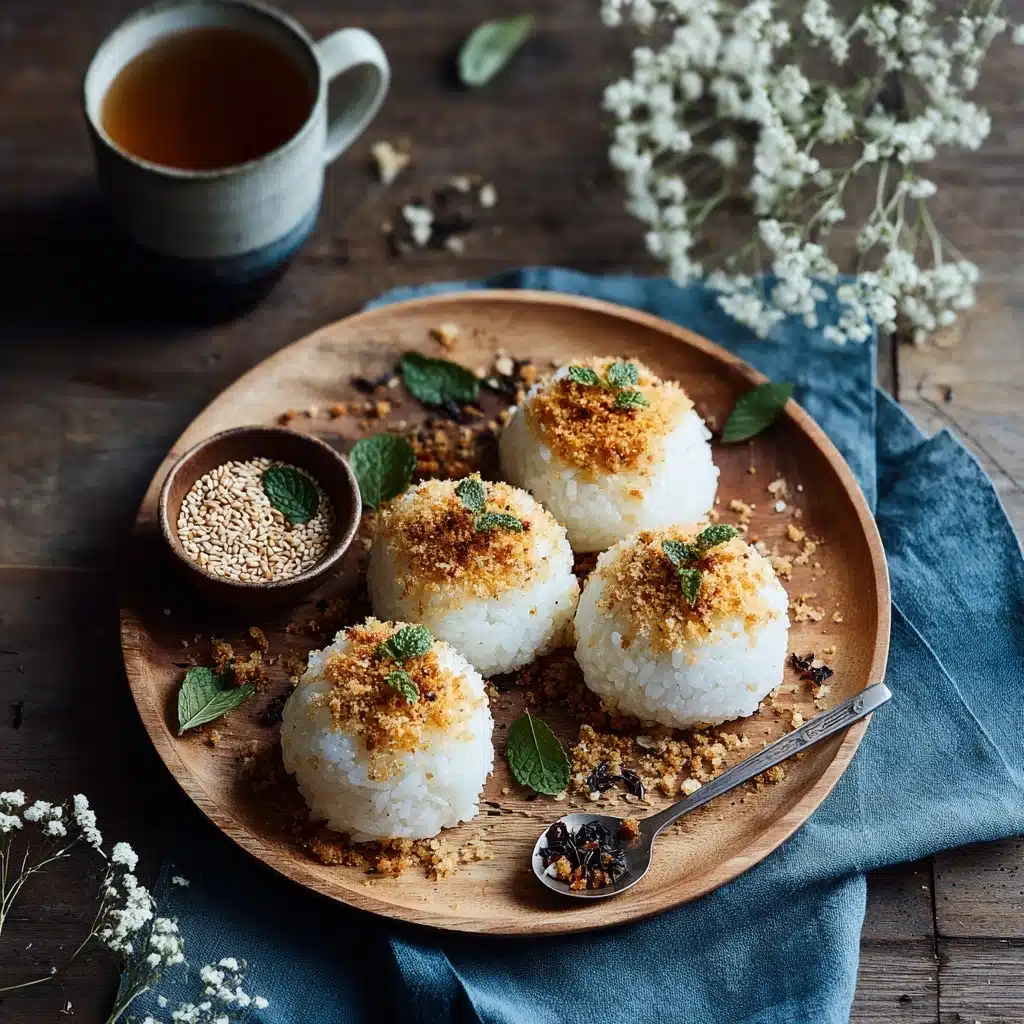
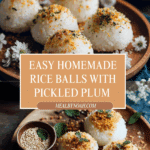
Rice Balls Recipe
If you’re craving a comforting treat that’s both simple to make and bursting with flavor, this Rice Balls Recipe is exactly what you need. These delightful, handheld pockets of perfectly cooked rice encase your favorite fillings, creating a harmonious blend of textures and tastes that feel like a warm hug from the inside out. Whether you’re packing lunch for a busy day or looking for a charming appetizer, rice balls are versatile, delicious, and absolutely satisfying.
Ingredients You’ll Need
The magic of this Rice Balls Recipe lies in its simplicity—each ingredient plays a vital role, providing texture, flavor, or a pop of color that makes every bite special. From the perfectly sticky short-grain rice to the salty-sweet notes of pickled plum filling, these essentials set the stage for an unforgettable experience.
- Short-grain rice (2 cups): The key to that perfect sticky texture which helps the rice balls hold their shape.
- Water (2 1/2 cups): Used for cooking the rice evenly, making sure it’s tender but not mushy.
- Salt (1/2 teaspoon): Enhances the rice’s natural flavor without overpowering it.
- Nori sheets (4 sheets): Optional, but adds a lovely, slightly crisp oceanic flavor when wrapped around each rice ball.
- Pickled plum filling (1/2 cup): A traditional and tangy surprise inside, but feel free to swap with tuna, salmon, or vegetables for variety.
- Sesame seeds (to taste): Optional, these add a toasty crunch and a beautiful finishing touch.
How to Make Rice Balls Recipe
Step 1: Rinse and Prepare the Rice
Begin by rinsing 2 cups of short-grain rice under cold water until the water runs clear. This step is crucial to remove excess starch, ensuring the rice cooks up fluffy yet sticky without being gluey. It might feel a bit tedious, but trust me—it makes all the difference in the final texture.
Step 2: Soak and Cook the Rice
Place the rinsed rice in a pot or rice cooker and add 2 1/2 cups of water. Let the rice soak for about 30 minutes; this gentle soak helps the grains absorb water evenly and results in perfectly cooked rice. When ready, bring to a boil, then reduce heat to low and cover the pot. Cook for approximately 18-20 minutes until all the water is absorbed and the rice is tender.
Step 3: Let the Rice Rest and Season
After turning off the heat, leave the rice covered for 10 minutes to continue steaming gently. Then, sprinkle in 1/2 teaspoon of salt and fluff the rice gently with a wooden spoon or spatula, breaking up any clumps while keeping the grains intact and sticky.
Step 4: Shape the Rice Balls
Wet your hands lightly with water to prevent the rice from sticking to your fingers—this little tip will save you some frustration! Take about 1/4 cup of rice and flatten it slightly in your palm. Place a small dollop of your chosen filling, like pickled plum, right in the center. Carefully mold the rice around the filling into your preferred shape—be it a triangle or round ball. Repeat the process with the remaining rice and filling.
Step 5: Wrap With Nori and Garnish
If you’re using nori, cut the sheets into strips and wrap them around the rice balls. This adds a pop of color, texture, and that classic umami taste. Finally, sprinkle some sesame seeds on top for a subtle nutty note and visual appeal.
How to Serve Rice Balls Recipe
Garnishes
A simple sprinkle of toasted sesame seeds brings a satisfying crunch and a fragrant aroma that complements the soft rice. You can also add finely chopped scallions or a light brush of soy sauce for an extra burst of flavor and a glossy finish.
Side Dishes
This Rice Balls Recipe pairs beautifully with miso soup, a fresh seaweed salad, or pickled vegetables to round out your meal. The lightness of these sides contrasts perfectly with the hearty rice balls, transforming your snack or lunch into a well-balanced feast.
Creative Ways to Present
For a fun twist, try arranging your rice balls on a platter with colorful vegetable sticks or edible flowers for a festive look. You can also serve them with dipping sauces like teriyaki or spicy mayo alongside, making every bite interactive and exciting.
Make Ahead and Storage
Storing Leftovers
If you have any leftover rice balls, place them in an airtight container and refrigerate for up to 24 hours. Keep in mind the texture of the rice might firm up slightly, but they will still taste delicious and are perfect for a quick snack.
Freezing
To freeze your rice balls, wrap each one individually in plastic wrap and place them in a freezer-safe bag or container. They can stay frozen for up to a month. When you want a fuss-free meal later, simply thaw and reheat them.
Reheating
The best way to reheat rice balls is by steaming or microwaving with a damp paper towel on top to maintain moisture. This will help restore their soft, fluffy texture without drying them out.
FAQs
Can I use other types of rice for this recipe?
Short-grain rice is best for this Rice Balls Recipe because of its sticky nature, which helps the balls hold their shape. Long-grain or basmati rice won’t stick well and might cause the rice balls to fall apart.
What are some popular fillings besides pickled plum?
You can get creative with fillings like seasoned tuna, grilled salmon, cooked vegetables, or even spicy mayo mixtures. The filling is where you can really personalize your rice balls!
Is nori necessary for the rice balls?
Nori adds flavor and ease of handling, but it’s entirely optional. You can enjoy rice balls plain or serve them with dipping sauces if you prefer to skip the seaweed.
How can I make the rice balls less sticky on my hands?
Wet your hands with water before shaping the rice balls, and if you want, lightly oil your hands to prevent sticking. This makes the process smoother and quicker.
Can I make rice balls vegan or vegetarian?
Absolutely! Fillings like pickled plum, seasoned vegetables, or sautéed mushrooms work beautifully for a vegetarian or vegan version of this recipe.
Final Thoughts
This Rice Balls Recipe is a fantastic addition to your culinary repertoire—simple enough for a quick meal yet special enough to impress family and friends. The harmony of fluffy rice, flavorful fillings, and optional nori wrapping makes it a versatile and beloved dish that you’ll want to make again and again. Don’t wait to give it a try and add your own personal twist to these charming little bites!
Print
Rice Balls Recipe
- Total Time: 1 hour
- Yield: 8–10 rice balls 1x
- Diet: Gluten Free
Description
This traditional Rice Balls recipe offers a simple yet delicious way to enjoy short-grain rice formed into convenient, portable snacks. Filled with flavorful pickled plum or other fillings such as tuna or vegetables, and optionally wrapped in crisp nori sheets, these rice balls are perfect for lunchboxes, picnics, or light meals. The recipe emphasizes soaking and cooking the rice to the perfect consistency, ensuring each bite is tender and tasty.
Ingredients
Rice
- 2 cups short-grain rice (uncooked, rinsed until water runs clear)
- 2 1/2 cups water
- 1/2 teaspoon salt
Filling
- 1/2 cup pickled plum (umeboshi) or alternative fillings such as tuna, salmon, or vegetables
Optional Garnish
- 4 sheets nori (seaweed sheets, cut into strips for wrapping)
- Sesame seeds, to taste
Instructions
- Rinse Rice: Rinse the short-grain rice under cold water until the water runs clear to remove excess starch, which prevents the rice from becoming too sticky.
- Soak Rice: Combine the rinsed rice with 2 1/2 cups of water in a large pot or rice cooker. Let it soak for about 30 minutes to hydrate evenly for better texture.
- Cook Rice: If using a pot, bring the water and rice to a boil over medium heat. Once boiling, reduce heat to low, cover, and cook for 18-20 minutes until the rice is tender and water is absorbed. If using a rice cooker, follow the manufacturer’s instructions.
- Rest and Season: Remove the rice from heat and let it rest covered for 10 minutes. Then gently fluff with a wooden spoon and sprinkle in salt, mixing carefully.
- Shape Rice Balls: Wet your hands with water to prevent sticking. Take about 1/4 cup of rice, flatten it lightly in your palm, then place a small amount of your chosen filling in the center. Mold the rice around the filling, forming a triangle or ball shape. Repeat with remaining rice and filling.
- Wrap with Nori (Optional): Cut nori sheets into strips and wrap them around each rice ball for added flavor and easier handling.
- Garnish and Serve: Arrange the rice balls on a plate and sprinkle with sesame seeds if desired. Serve immediately or pack for on-the-go meals.
Notes
- Using short-grain rice is essential for the proper sticky texture of rice balls.
- Soaking the rice before cooking improves texture and even cooking.
- Fillings can be customized – try tuna mayo, cooked salmon flakes, or pickled vegetables.
- Wet hands prevent rice from sticking while shaping.
- Nori wrapping adds flavor and helps keep the rice ball intact.
- Rice balls are best eaten fresh but can be stored in an airtight container for up to a day.
- Prep Time: 40 minutes
- Cook Time: 20 minutes
- Category: Snack
- Method: Boiling, Shaping
- Cuisine: Japanese
Nutrition
- Serving Size: 1 rice ball (approx. 80g)
- Calories: 150
- Sugar: 1g
- Sodium: 300mg
- Fat: 1g
- Saturated Fat: 0.2g
- Unsaturated Fat: 0.7g
- Trans Fat: 0g
- Carbohydrates: 34g
- Fiber: 1g
- Protein: 3g
- Cholesterol: 0mg
Keywords: rice balls, onigiri, Japanese snack, portable lunch, umeboshi rice balls, nori wrapped rice balls, rice snack


