
Perfect Poached Eggs: Easy and Whirlpool Methods for Soft, Runny Whites Recipe
Introduction
Poached eggs are a simple yet elegant way to enjoy eggs with a delicate texture and runny yolk. Whether for breakfast or a light meal, mastering poaching can elevate your dishes. This guide covers two reliable methods to poach eggs perfectly every time.
Ingredients
- 1 to 6 eggs, cold from the fridge
- 2 tablespoons white vinegar or cider vinegar (for Whirlpool method only)
Instructions
- Step 1: Strain the eggs. Crack an egg into a small strainer set over a bowl. Let it sit for 30 seconds, gently jiggle to strain off the watery whites.
- Step 2: Carefully transfer the egg to a teacup. Repeat for each egg you plan to poach at once (maximum 2 for Whirlpool method, up to 6 for Easy method).
- Step 3: Boil water in a pot, then reduce the heat. Bring water to a boil over high heat, then lower to keep tiny bubbles on the pot’s base without large bubbles breaking the surface.
- Step 4: For the Easy Method, fill a pot with about 7.5 cm (3 inches) of water and bring to a boil, then lower heat as described.
- Step 5: Submerge each teacup into the water and gently slide the egg onto the base of the pot to minimize drop distance and keep shape neat.
- Step 6: Add eggs within 15 seconds. After 20 seconds from first egg addition, use a slotted spoon and a smaller spoon to gently turn eggs upside down, starting with the first egg added.
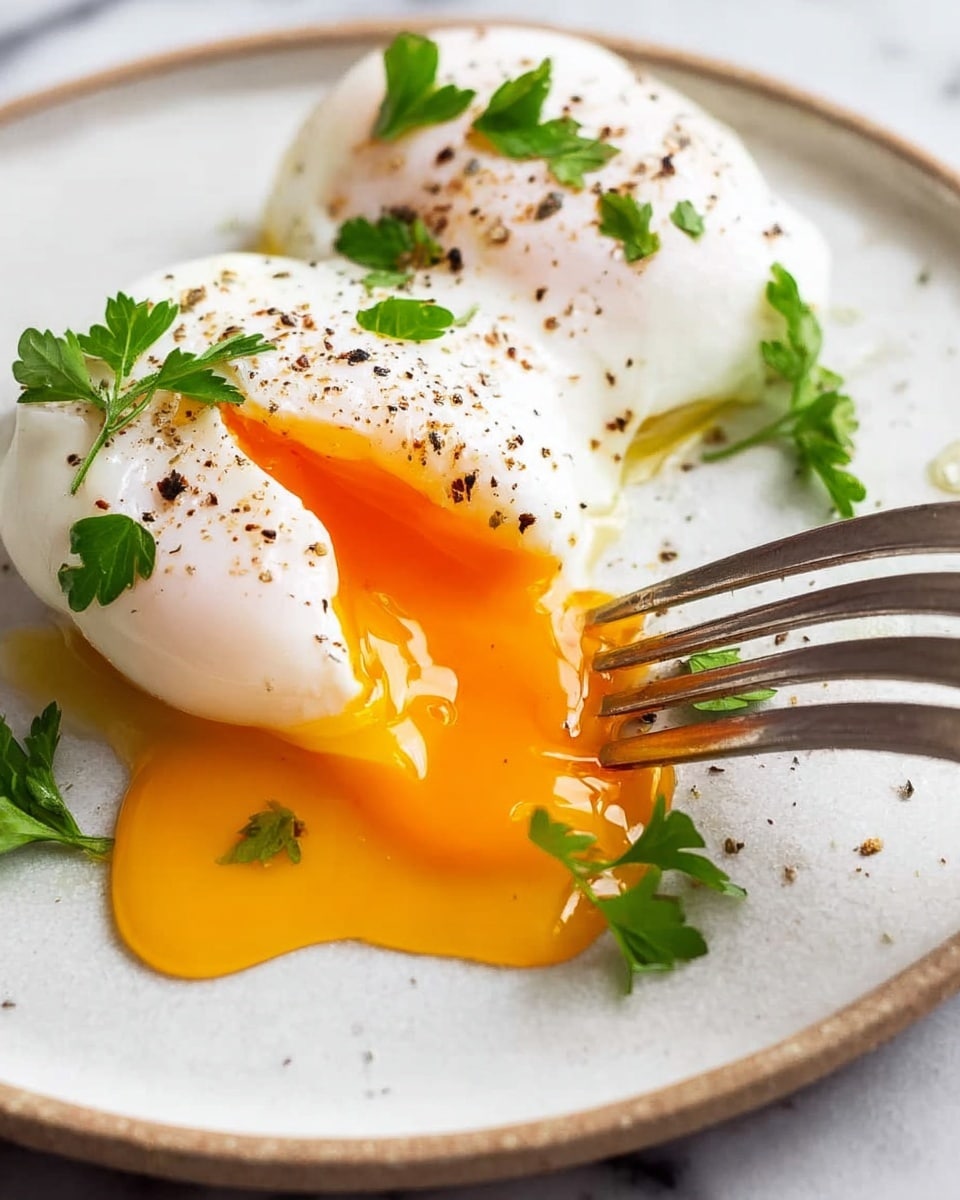
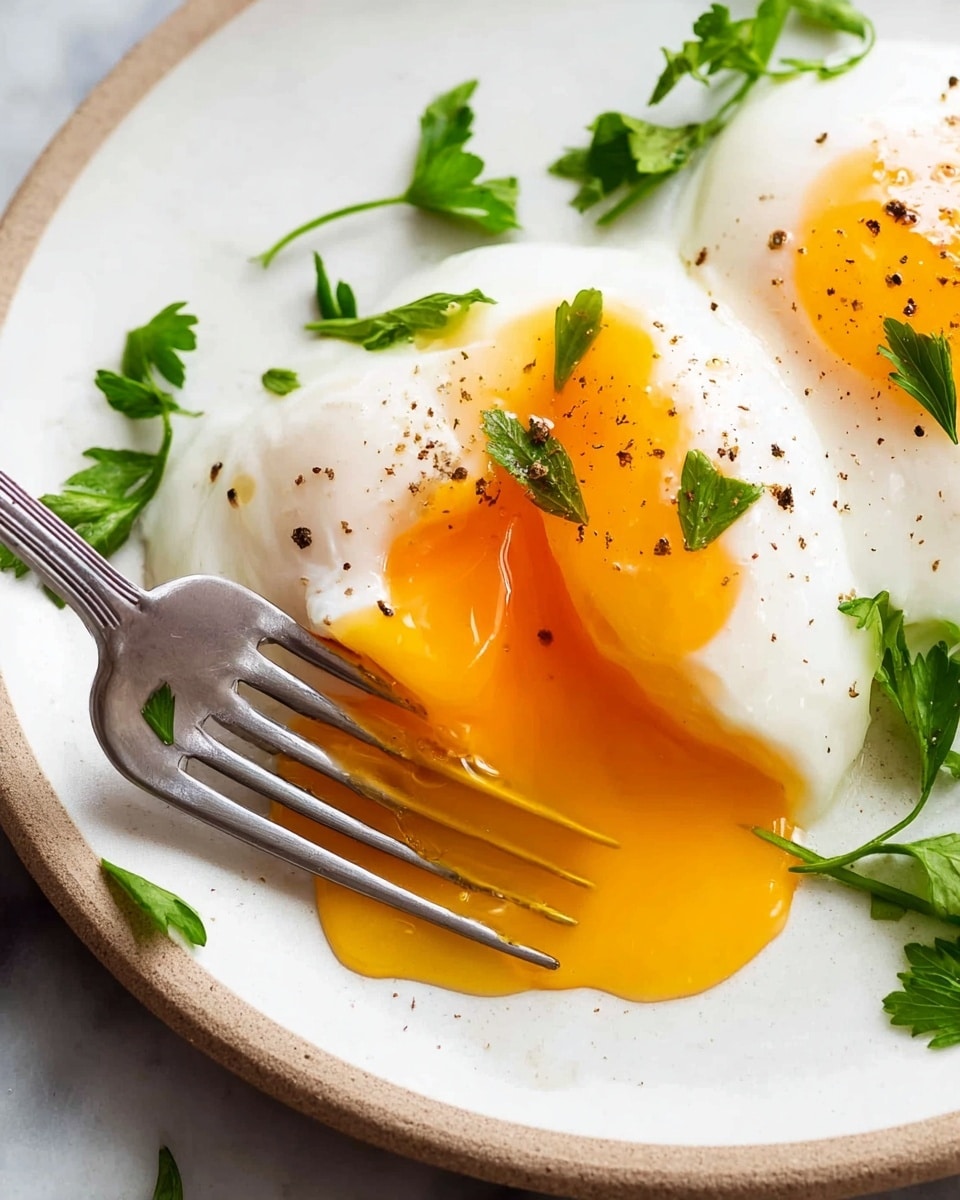
- Step 7: Let eggs cook for 1 minute, then turn them again. After another 30 seconds, check one egg with a slotted spoon; whites should be soft but set, yolks runny.
- Step 8: Lift eggs out and place on paper towels to drain and dry with residual heat for about 15 seconds. Serve promptly to avoid sticking to the towel.
- Step 9: For the Whirlpool Method, fill a pot with 7.5 cm (3 inches) water and add vinegar if desired. Bring to boil, then lower heat as above.
- Step 10: Stir water rapidly with the handle of a flat wooden spoon to create a 10 cm (4 inch) whirlpool that lasts 7 seconds.
- Step 11: Carefully slip the egg from the teacup into the center of the vortex without touching the water to maintain the whirlpool effect.
- Step 12: The spinning water wraps the whites around the yolk, forming a neat shape in about 15 seconds. Let cook for 1½ to 2 minutes. You may gently rotate or swirl the water once or twice after 30 seconds if desired.
- Step 13: Lift egg out with a slotted spoon and check doneness as before. Drain on paper towels for 15 seconds before serving.
- Step 14: To poach multiple eggs with Whirlpool method, use 15 cm (6 inches) water. Add eggs one after another, swirling to reset the whirlpool each time after the previous egg sets (~30 seconds). Experts can handle up to 4 eggs simultaneously, though the Easy method is simpler for several eggs.
Tips & Variations
- Use fresh eggs for the best shape and texture when poaching.
- Cold eggs from the fridge strain better, reducing watery whites for neater poached eggs.
- Adding vinegar helps whites set faster and hold shape, especially in the Whirlpool method, but is optional.
- The Easy method is ideal for poaching multiple eggs at once with less fuss.
- Serve poached eggs on toasted bread, salads, or with hollandaise sauce for a classic take on eggs Benedict.
Storage
Poached eggs are best eaten immediately for optimal texture. If needed, store cooled poached eggs in an airtight container in the refrigerator for up to 2 days. To reheat, warm gently in simmering water for about a minute to avoid overcooking. Avoid microwaving as it can toughen the egg.
How to Serve
Serve this delicious recipe with your favorite sides.
FAQs
Can I poach eggs without vinegar?
Yes, you can poach eggs without vinegar. Vinegar helps the whites coagulate faster, but fresh eggs and controlling water temperature also produce good results, especially with the Easy method.
How do I know when a poached egg is done?
The whites should be softly set and completely opaque, while the yolk remains runny. You can gently lift the egg from the water and give it a slight touch to test the firmness.
Print
Perfect Poached Eggs: Easy and Whirlpool Methods for Soft, Runny Whites Recipe
- Total Time: 15 to 18 minutes
- Yield: Up to 6 eggs (Easy Method) or 1–4 eggs (Whirlpool Method) 1x
- Diet: Low Fat
Description
Master the art of perfectly poached eggs with two reliable methods: the Easy Method for multiple eggs and the Whirlpool Method for a classic single egg. Both techniques ensure tender, softly set whites and deliciously runny yolks, perfect for breakfast or as a topping for salads and toast.
Ingredients
Ingredients
- 6 cold eggs from the fridge
- 2 tbsp white vinegar or cider vinegar (optional, for Whirlpool Method only)
Instructions
- Strain Eggs: Crack each egg into a small strainer set over a bowl or glass. Let it sit for 30 seconds and gently jiggle, allowing the watery whites to drain through for a neater poach.
- Prepare Eggs in Cups: Carefully transfer each strained egg to separate teacups. Prepare all eggs you plan to cook in one batch—maximum 2 for Whirlpool Method, up to 6 for Easy Method.
- Heat Water: Boil water in a pot, then reduce heat until only tiny bubbles form at the base but no large bubbles break the surface.
- Easy Method Setup: Fill a pot with 7.5 cm (3 inches) of water and bring to a boil, then lower heat as described.
- Cook Eggs One by One: Submerge a teacup in the water to minimize drop distance and gently roll each egg into the base of the pot. Add eggs within 15 seconds.
- Turn Eggs Gently: After 20 seconds, use a slotted spoon and a tablespoon to carefully flip the eggs over, starting with the first added.
- Repeat Turning: Wait 1 minute, then turn eggs again.
- Check Doneness: After 30 seconds from the second turn, lift one egg with a slotted spoon to check. Whites should be soft but set, yolks runny.
- Drain and Serve: Transfer eggs to paper towels to drain and dry slightly with residual heat for about 15 seconds, avoiding sticking. Serve immediately with your favorite accompaniments.
- Whirlpool Method Setup: Fill a saucepan with 7.5 cm (3 inches) of water, add vinegar if using, and bring to a boil, then reduce heat as before.
- Create Whirlpool: Stir water rapidly in a 10 cm (4 inch) diameter circle using a flat-handled wooden spoon to form a vortex that holds for 7 seconds.
- Add Egg in Center: Carefully slip an egg into the vortex’s center close to the water surface without breaking the whirlpool.
- Let Poach: The spinning water wraps the white around the yolk, forming a neat shape. Let cook for 1.5 to 2 minutes, optionally swirling gently after 30 seconds.
- Check and Remove Egg: Lift the egg with a slotted spoon to check it is softly set and yolk runny.
- Drain and Serve: Transfer to paper towel, letting residual heat dry the top for 15 seconds without sticking. Serve immediately.
- Multiple Poaches Whirlpool: For more eggs, increase water depth to 15 cm (6 inches). After the first egg sets (~30 seconds), create a whirlpool again for each additional egg. Up to 4 eggs are possible, though the Easy Method is preferred for multiples.
Notes
- Use eggs straight from the fridge for better poaching results.
- Vinegar helps the egg white coagulate faster and is recommended for the Whirlpool Method but is optional.
- Water depth should be around 7.5 cm (3 inches) for single eggs, increased to 15 cm (6 inches) for multiple poaching in the Whirlpool Method.
- Maintain gentle simmering water with tiny bubbles but no rolling boil to avoid breaking eggs apart.
- Straining eggs before cooking removes excess watery whites, yielding a neater poached egg.
- Limit the time to add multiple eggs in the Easy Method to keep cooking times consistent.
- Don’t let poached eggs sit too long on paper towels to prevent sticking.
- Prep Time: 10 minutes
- Cook Time: 5 to 8 minutes depending on number of eggs
- Category: Breakfast
- Method: Stovetop
- Cuisine: Western
Keywords: poached eggs, breakfast eggs, easy poached eggs, whirlpool poaching, stovetop poached eggs


