
Crunchy Roasted Chickpea Pitas Recipe
If you love the satisfying crunch of perfectly seasoned chickpeas wrapped inside warm, fluffy bread, then you’re going to adore these Crunchy Roasted Chickpea Pitas. This dish takes humble ingredients like chickpeas and simple pita dough and transforms them into a delicious, wholesome meal bursting with layers of flavor and texture. It’s one of those recipes that feels both comforting and fresh, with crispy roasted chickpeas offering a delightful contrast to creamy hummus and tangy feta, all tucked inside homemade whole wheat pitas. Whether you’re craving a quick lunch or an impressive snack for friends, Crunchy Roasted Chickpea Pitas will steal the spotlight every time.
Ingredients You’ll Need
These ingredients might look simple, but each one plays a crucial role in building the irresistible layers of flavor and texture in your Crunchy Roasted Chickpea Pitas. From the smoky spices coating the chickpeas to the soft, homemade pita bread, every element comes together seamlessly.
- Chickpeas: The star of the dish, providing a hearty, protein-packed crunch once roasted perfectly.
- Olive oil: Used for roasting and drizzling to add moisture, richness, and help meld the spices onto the chickpeas.
- Smoked paprika: Brings a subtle smoky warmth that elevates every bite without overpowering.
- Garlic powder: Adds fragrant depth and a gentle kick to the chickpea coating.
- Brown sugar: Balances the spices with a hint of sweetness, helping caramelize the chickpeas.
- Allspice: Offers a unique warmth and complexity that rounds out the flavor profile.
- Cherry or grape tomatoes: Juicy and fresh, they add a burst of color and brightness.
- Hummus: Creamy and smooth, it provides the perfect base spread inside the pita pockets.
- Feta cheese: Crumbled for a salty tang that pairs beautifully with the roasted chickpeas.
- Fresh dill and oregano: Herbaceous notes that bring freshness and an aromatic lift.
- Active dry yeast and honey: The dynamic duo that works magic to make the pita dough rise beautifully.
- Whole wheat and all-purpose flour: Together they create a pita texture that’s tender with a slight chew.
- Canola oil: Ideal for brushing the skillet and crisping the pita without burning.
How to Make Crunchy Roasted Chickpea Pitas
Step 1: Roast the Chickpeas to Crunchy Perfection
Start by preheating your oven to 425°F and lining a baking sheet with foil or parchment. Dry the rinsed chickpeas as much as possible to ensure they crisp up nicely. Toss them with olive oil and the blend of salt, pepper, smoked paprika, garlic powder, brown sugar, and a pinch of allspice. Spread them evenly on the baking sheet so they roast uniformly, which will give you that irresistible Crunchy Roasted Chickpea Pitas texture. Bake for 15 to 20 minutes, flip and toss them carefully, then return them to the oven for another 15 to 20 minutes. You’ll want them deeply golden and crispy because that crunch is what makes these pitas so special!
Step 2: Make the Homemade Whole Wheat Pita Dough
While your chickpeas roast, it’s pita dough time. In a bowl, combine warm water, yeast, and honey, stirring gently and letting it sit for about 10 minutes until it foams. This activation is what ensures soft and rise-ready pitas. Then stir in whole wheat flour, all-purpose flour, and salt until the dough starts to come together. Knead on a floured surface for at least 5 minutes until it feels silky and elastic—you’re working magic here! Place the dough in an oiled bowl, cover it, and leave it in a warm spot to rise until doubled, roughly 1 1/2 hours. This step gives your bread that authentic homemade charm that perfectly complements the chickpeas.
Step 3: Shape and Cook the Pitas
Once risen, punch down the dough gently and knead a bit more if sticky. Divide it into 8 equal pieces and roll each as thin as you can—think paper-thin! Heating a cast iron skillet over medium-high heat and brushing with canola oil sets the stage for perfectly cooked pitas. Place one dough round on the skillet, cooking it just until bubbles form (about 30 seconds), then flip and cook another 1–2 minutes until puffy with golden spots. Flip one last time for a minute and set aside. Repeat with the remaining dough, and you’ll soon have a stack of warm, tender pitas ready to fill.
Step 4: Assemble Your Crunchy Roasted Chickpea Pitas
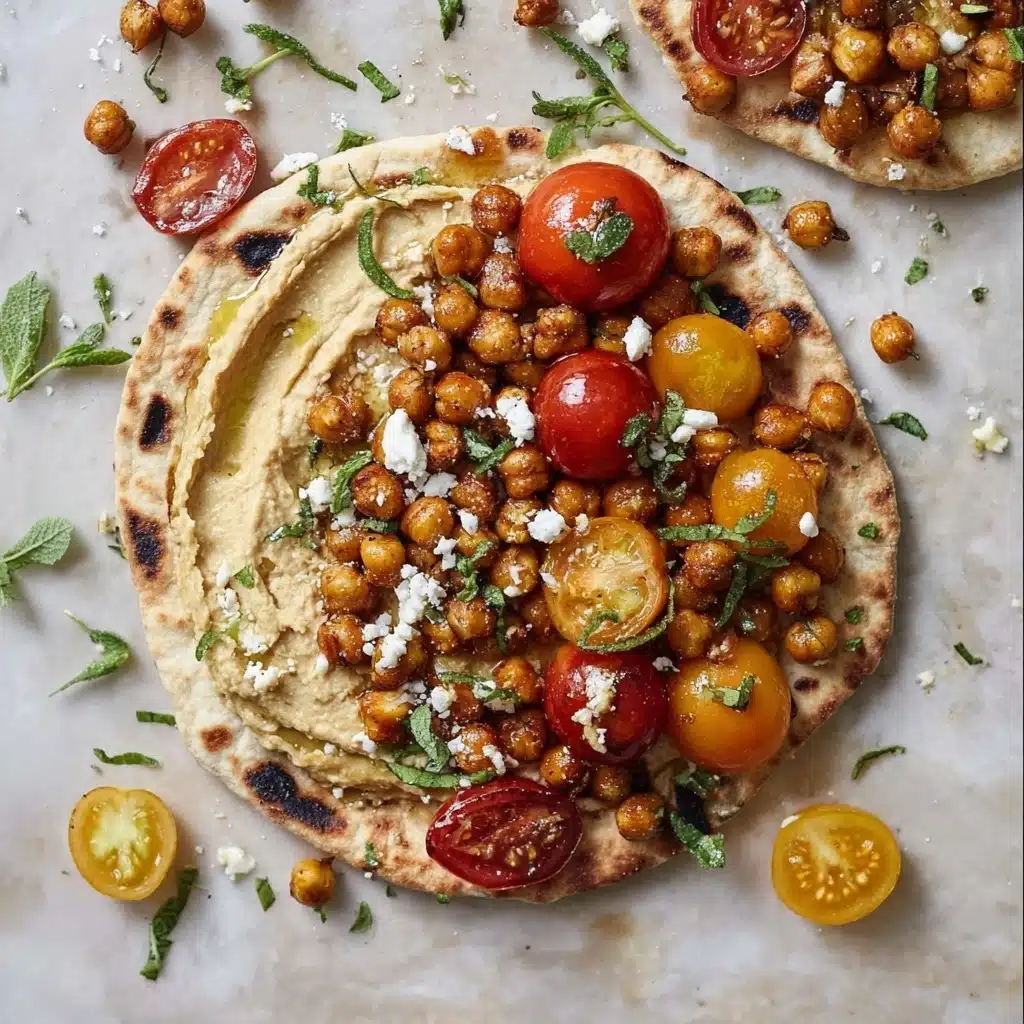
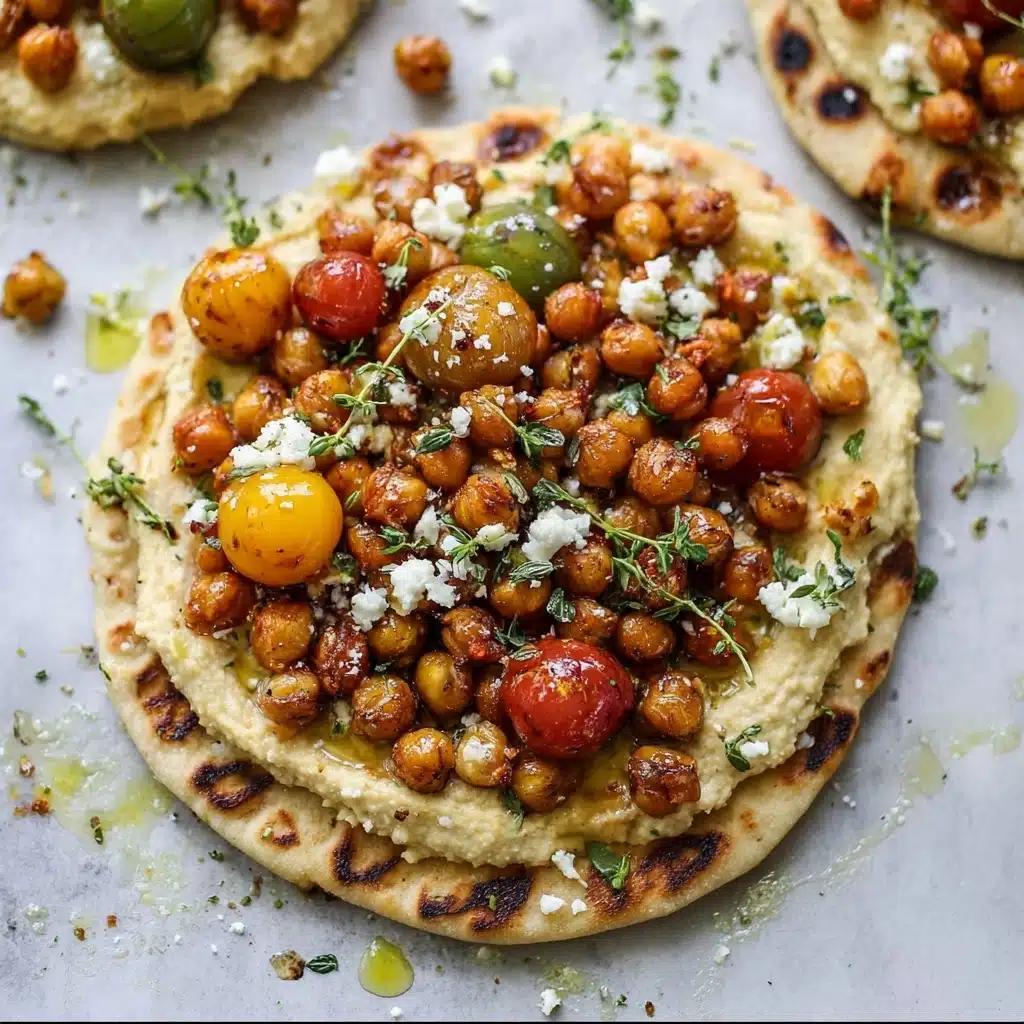
The best part: coming together! Spread each pita generously with hummus, then add a generous heap of those crunchy roasted chickpeas. Top with halved tomatoes, crumbled feta, fresh dill, and oregano for the green sparkle and sharpness that brighten every bite. If you want to go all out, a drizzle of olive oil or a few olives and roasted red peppers add even more flavor layers. Folding or lightly pressing the pita closed creates that perfect handheld meal that bursts with crunchy, creamy, savory goodness.
How to Serve Crunchy Roasted Chickpea Pitas
Garnishes
Fresh herbs like dill and oregano are your go-to garnishes, adding vibrant color and a fragrant finish. Crumbled feta effortlessly balances the texture and flavor with its salty creaminess, while a quick drizzle of extra virgin olive oil adds a fruity richness that glistens on top. Don’t be afraid to pile on elements that bring freshness and contrast to the crunchy chickpeas.
Side Dishes
Simple side salads with crisp cucumbers, lemony vinaigrettes, or even a light tabbouleh pair beautifully with these pitas. Roasted vegetables or warm lentil soups also make wonderful companions, enhancing the wholesome, Mediterranean-inspired vibes on your plate. The contrast between crunchy, creamy, and fresh components will keep your taste buds delighted.
Creative Ways to Present
You can serve these as open-faced pita platters for a casual, shareable feast or wrap them tightly for on-the-go lunches. For a party, cut the assembled pitas into small wedges and serve with toothpicks as savory bites. Adding a dollop of tzatziki or a side of spiced yogurt dip brings extra tang and cooling notes that make serving crunchier roasted chickpea pitas a complete celebration.
Make Ahead and Storage
Storing Leftovers
If you have any leftover roasted chickpeas or pitas, store them separately in airtight containers to keep their textures intact. Chickpeas stay crunchy for a couple of days at room temperature, while pitas keep best wrapped in plastic or foil at room temperature to stay soft but not soggy.
Freezing
You can freeze pita bread by wrapping them tightly in foil or freezer bags to protect from freezer burn; they thaw quickly at room temperature or a quick toast revives them beautifully. Roasted chickpeas, however, don’t freeze well as they lose their crunch, so it’s best to eat them fresh or store only at room temperature for snacking.
Reheating
Reheat pitas gently in a dry skillet or wrapped in foil in an oven to restore softness without drying out. For roasted chickpeas, a quick toss in a hot oven for a few minutes reinvigorates their crispiness and aroma, making every bite feel fresh as if just made.
FAQs
Can I use canned chickpeas straight from the can?
Yes! Just make sure to drain and rinse them thoroughly, then pat them dry to remove excess moisture so they roast up crisp and crunchy instead of soggy.
What if I don’t have smoked paprika?
Regular paprika works fine, but you can add a pinch of chili powder or a dash of cumin to introduce some smokiness to your roasted chickpeas in place of smoked paprika.
Is it necessary to make homemade pita bread?
Not at all! Store-bought whole wheat pitas are a convenient shortcut, though homemade pitas add a special touch and freshness that really elevate the dish.
Can I make this recipe gluten-free?
For a gluten-free version, try using gluten-free flour blends for the pita dough or opt for gluten-free flatbreads available at many stores. The chickpea filling is naturally gluten-free!
How long do the Crunchy Roasted Chickpea Pitas keep good if stored properly?
The roasted chickpeas last a few days crisp at room temperature if stored airtight, while the pitas keep well for about 2 days at room temperature or up to a week refrigerated wrapped tightly.
Final Thoughts
Crunchy Roasted Chickpea Pitas are undoubtedly one of those recipes you’ll return to again and again—simple ingredients transformed into something extraordinary. They’re healthy, packed with flavor, and deliver an unbeatable mix of textures that satisfy both your cravings and your soul. So grab your apron, roll up your sleeves, and treat yourself and your loved ones to this delicious, wholesome meal that feels like a warm hug in every bite!
Print
Crunchy Roasted Chickpea Pitas Recipe
- Total Time: 2 hours 5 minutes
- Yield: 8 pitas 1x
- Diet: Vegetarian
Description
This recipe for Crunchy Roasted Chickpea Pitas combines crispy, spiced roasted chickpeas with fresh tomatoes, creamy hummus, and tangy feta cheese, all wrapped in warm homemade whole wheat pitas. It’s a delicious, healthy, and satisfying meal perfect for lunch or dinner, featuring Mediterranean flavors and wholesome ingredients.
Ingredients
For the Roasted Chickpeas
- 2 cans chickpeas (drained and rinsed)
- 1 tablespoon olive oil
- 1/4 teaspoon salt
- 1/4 teaspoon pepper
- 1/2 teaspoon smoked paprika
- 1/2 teaspoon garlic powder
- 1/2 teaspoon brown sugar
- Pinch of allspice
For the Pita Bread
- 1 cup warm water
- 1 package (2 1/4 teaspoons) active dry yeast
- 1 tablespoon honey
- 1 1/2 cups whole wheat flour
- 1 cup all-purpose flour (plus extra for kneading)
- 1/2 teaspoon salt
- Canola oil (for brushing)
For Assembling
- 1 cup cherry or grape tomatoes (halved)
- 1/2 cup your favorite hummus
- 4 ounces feta cheese (crumbled)
- Fresh dill and oregano for topping
- Olive oil (for drizzling, optional)
Instructions
- Prepare Oven and Chickpeas: Preheat the oven to 425°F (220°C) and line a baking sheet with foil or parchment paper. Pat the drained chickpeas dry with a paper towel and remove any loose skins to ensure crispiness.
- Season and Roast Chickpeas: Spread chickpeas on the baking sheet in a single layer. Drizzle with olive oil and sprinkle with salt, pepper, smoked paprika, garlic powder, brown sugar, and allspice. Toss to coat evenly. Roast for 15-20 minutes, then toss and flip the chickpeas and roast for another 15-20 minutes until golden and crunchy.
- Prepare Pita Dough Starter: In a bowl, combine warm water, active dry yeast, and honey. Stir once to mix and let it sit until foamy, about 10 minutes, indicating that the yeast is activated.
- Make Dough: Stir in the whole wheat flour, all-purpose flour, and salt until dough just comes together. Use your hands to bring the dough into a ball. If too sticky, add extra all-purpose flour as needed.
- Knead Dough: Transfer dough to a floured surface and knead for about 5 minutes until smooth and slightly elastic. Oil a large bowl, place the dough inside, cover with a clean cloth, and let it rise in a warm place until doubled in size, approximately 1 1/2 hours.
- Shape Dough: Punch down dough and knead lightly on a floured surface. Cut into 8 equal pieces. Roll each piece out as thin as possible, creating very thin rounds.
- Cook Pitas: Heat a cast iron skillet or heavy pan over medium-high heat and brush with canola oil. Place a dough round on the skillet and cook for 30 seconds until bubbles start to form. Flip and cook for 1-2 minutes until puffy with golden spots, then flip again and cook for another minute. Repeat with remaining dough.
- Assemble Pitas: Spread a generous spoonful of hummus on each pita. Top with roasted chickpeas, halved cherry or grape tomatoes, crumbled feta, and fresh dill and oregano. Drizzle with olive oil if desired. Optionally add olives or roasted red peppers for extra flavor.
Notes
- Drying the chickpeas well before roasting is key to achieving maximum crunchiness.
- The roasted chickpeas can be stored in an airtight container for snacking throughout the week.
- When rolling the pita dough, aim for very thin rounds for proper puffing during cooking.
- If the dough is too sticky, add flour gradually during kneading to maintain smooth texture.
- You can substitute canola oil with any high heat oil like grapeseed or avocado for cooking pitas.
- Roasted red peppers and olives make excellent additional toppings to customize your pitas.
- Prep Time: 25 minutes
- Cook Time: 40 minutes
- Category: Lunch
- Method: Roasting, Baking, Skillet Cooking
- Cuisine: Mediterranean
Nutrition
- Serving Size: 1 pita with toppings
- Calories: 320 kcal
- Sugar: 5 g
- Sodium: 420 mg
- Fat: 12 g
- Saturated Fat: 4 g
- Unsaturated Fat: 7 g
- Trans Fat: 0 g
- Carbohydrates: 40 g
- Fiber: 8 g
- Protein: 13 g
- Cholesterol: 15 mg
Keywords: roasted chickpeas, pita bread, homemade pita, crunchy chickpeas, Mediterranean vegetarian sandwich, healthy lunch, whole wheat pita, hummus pita


